

How To Make A Willow Chair
Posted June 9th, 2021
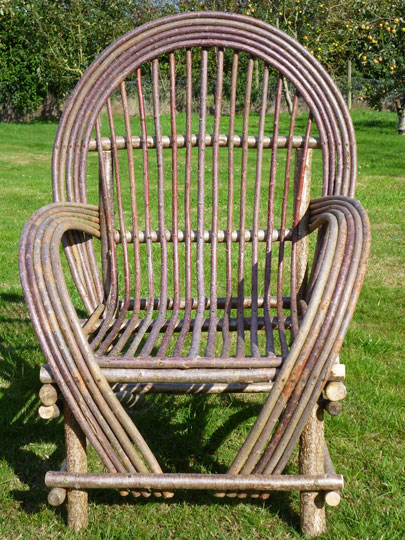
How to build a bent willow chair
Complement your abode or outdoor space with an like shooting fish in a barrel chair, rocking chairs or a living willow chair! This guide should assist you lot to build a bent willow chair – a fantastic piece of willow furniture. Building a willow chair is incredibly satisfying. But imagine, when you've finished you can literally sit dorsum and enjoy your endeavours.
Willow tin can offering so much visually to a garden or domicile. At that place are so many attractive stem colours,
Chair Blueprint
No matter how big or how small a willow chair y'all build, its main structural components will always be in the same proportions.
The rear legs and the two big, horizontal dorsum remainder back up members should be twice the length of the front legs. All the rungs, braces, and crosspieces will be halfway betwixt the two in length.
The actual dimensions — for 3 different chair sizes — are equally follows:
A king-size chair has two 18-inch long front legs, 4 36-inch long rear legs and dorsum rest supports, and fourteen 27-inch long framing members.
A medium chair has two xiv inch legs, 4 28 inch pieces, and fourteen 21 inch members.
A miniature chair has 2 10 inch legs, four xx inch pieces, and xiv 15 inch members.
Tools Needed
- Galvanized framing nails, ii-ane/2 to 4 inch
- Finishing nails, ane inch and 1-5/eight inch, for armrests, headrest, seat/back
- Measuring record
- Small bow saw, rasp and hammer
- Secateurs
- Cordless drill, selection of bits
- Bristle paintbrush
- Linseed oil, turpentine
How To Guide
- Decide on the size of chair that you would similar to build. Using a small bow saw or secateurs, cut shoots to length.
- To make sides: On work table lay out side beams and front and back legs. Using corner of table equally a square, position 1 back leg on table parallel to and aslope edge of table; move bottom (foot) of back leg in three in from side edge of tabular array, ensuring that information technology touches bottom edge of tabular array. This is back slope of chair. Place 1 front leg 20 in from bottom of back leg parallel to side border of table (non sloped).
- Place elevation and lesser side beams (parallel to bottom border of table) across front and back legs, with lesser axle 4 in up from leg bottoms. Position front end of top side axle approx. 1 in down from tiptop of front leg. Adjust front and back legs to appropriate width. Using ii-1/2-in nails, fasten beams in place. Repeat for other side, making mirror image of first side.
- To join sides: Lay top forepart beam on top of top side beams; adjust width between sides and using 2-1/2-in nails, spike in place. Place bottom front beam on top of bottom side beams; adjust sides and blast in place every bit above.
- Working at back of frame, make up one's mind desired width at top between 2 back legs and arrange. Nail tiptop and bottom rear beams to dorsum legs every bit in Footstep 4.
- Identify headrest beam on top of back legs and so that information technology extends same amount on both sides; using 2-ane/2-in nails, spike.
- Eight inches above top rear axle, mensurate altitude between back legs and cut stretcher beam to fit. Using iii-one/2- or iv-in nails, fasten stretcher to back legs, nailing through each leg into center of stretcher axle.
- Position back ends of side braces inside back legs and nether bottom rear beam. Position forepart ends of side braces outside forepart legs and under tiptop side beams. Using two-one/2-in nails, fasten to front legs just.Examine frame, making certain everything is symmetrical! Square up frame by pushing or pulling on beams. Using 2-1/2-in nails, spike back ends of side braces to back legs.
- Secure frame past double nailing in every location.
- Using two-1/two-in nails, fasten forepart seat axle to acme side beams simply behind height front beam; attach rear seat axle to pinnacle side beams 5 in from top rear beam.
- To make offset armrest: Select 5 or half-dozen shoots and bow each along length by flexing gently over articulatio genus. Place root end of first shoot inside bottom front beam; bring other end upwardly and over to outside of back leg, forming gentle curve with highest point of bow 28 in from ground approx. in eye of side.Bend down upper part of shoot and using 1-5/8-in finishing nails, spike to back leg approx. eight in above superlative side beam. To achieve desired amount of armrest flare beyond outside of chair, adapt shoot past adjusting free root cease at front. Boom showtime shoot to top front beam, 4 or 5 shoot widths away from front leg. This shoot is the showtime of 5 or 6 to exist installed. Brand any adjustments using lower free cease, and then, using finishing blast, fasten to bottom front end beam approx. x to 12 in from terminate of beam. Repeat for other side. The shoot ends should be cropped later on.
- Fasten each successive shoot to back leg on top of preceding shoot, using 1-in finishing nails, fasten shoots to each other at iv- to 5-in intervals over entire length.
- To make headrest hoop: Bow each shoot every bit in Step 11. Place root end of first shoot inside top side beam on outside of armrest and behind rear seat beam, leaving overhang of 3 to iv. Loop shoot up and over chair dorsum in front of headrest beam and downward other side of chair, positioning shoot in aforementioned mode every bit on other side. This is lesser shoot of headrest hoop.Add together remaining hoops on top of previous shoots, alternating root and top ends. Adjust, then, using 1-in finishing nails, spike to headrest beam and at intervals every bit in Step 12.
- To make dorsum/seat: Rasp root ends of each shoot. Identify outset shoot in through back at eye, having rasped end resting on tiptop front beam and upper cease loose backside headrest hoop. (The rasped ends volition be lined upward evenly to create front end edge of seat.) Gently push shoot downward from top to work shoot into gentle curve at back of seat.While holding curve in position and using i-5/viii-in finishing nails, fasten to rear seat axle; and then spike to forepart seat beam, then to stretcher. Space each successive back/seat shoot as desired, matching curve of starting time shoot as closely equally possible.Using 1 nail per shoot, fasten loose summit ends to hoop; crop shoots at height. Crop armrest ends.
Adding The Finishing Affect
Once the chair is completed, stains and finishes can be applied, using one-part turpentine to 2 parts linseed oil. This type of finish should be renewed once a year. Doing this will help protect and prolong the beauty and life of your piece of furniture.
Variations – the list is endless!
Bent willow settee, dining chairs, garden benches, Love seats, couches, rocking chairs, like shooting fish in a barrel chairs, swings. If you have some great ideas, why not exit a comment in the section below, and cheque back for more than nifty ideas in the future.
The views expressed in our blog are those of the author and non necessarily lowimpact.org'southward
0 Comments
Source: https://www.lowimpact.org/build-bent-willow-chair/
Posted by: martincouseed1937.blogspot.com
0 Response to "How To Make A Willow Chair"
Post a Comment